Sunday 15 March 2015

How to root Huawei Honor Holly ?

How to root Huawei Honor Holly 

Steps to follow in the following series:
 

1. Click on this link.
Here I've uploaded all the software/drivers that you would be needing to root. Hence download all the files in it to your computer.

2. After the download completes, install the apps and driver in the following series. [This is important]

ADB Installer 1.4.2

Handset_WinDriver_1.00.00.31

DriverAutoInstaller_v1.1236.00


Then,

iRoot 1.7.9.10454

3. Connect phone via USB

4. Bring down the notification panel and click on the USB icon

5. Enable USB Debugging and select storage as connect method. (Do not select MTP, Camera or CD Drive mode)

6. After selecting storage mode "Do not tap" on "Mount the storage as USB" button which is at the bottom of the screen. Doing this will make your memory card unavailable and the root process will also fail.

7. Open the iRoot app and let it detect your phone. Make sure you have an active internet connection, so that it can download the drivers and install it automatically. This causes you an additional download of about 30 MB. [Don't worry its all worth it] 

8. After that the iRoot will install 3 Chinese apps on your phone. Do not do anything with it, let it complete on its own.

9. If everything goes well you will see the green Root button. Click on it.

10. Make sure the phone is fully charged and you have UPS backup on your computer. Any interruption after you click the Root button in iRoot can make your phone unusable. So take huge precautions during the process. (You've been warned now

11. Wait for 2 mins now and don't do anything. The phone will restart after the process is completed. You can see the ongoing status on iRoot itself. 

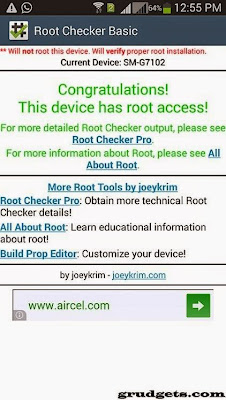
12. After successful completion you will see the below screen on iRoot app on your computer screen. 

iRoot Huawei Honor Holly Root

13. Your phone is rooted! 

Huawei Honor Holly Root

14. Download SuperSU app from Play Store and install. Open SuperSU, the Chinese app will pop up so as to grant SuperSU root permissions or not, remember to tap the RIGHT button in the Chinese app which is a YES.

15. Download Root Cleaner and uninstall all the Chinese apps from your phone, you do not need them anymore now. 

16. Update your SuperSU binaries and reboot the phone. 

That's all. Enjoy! 

How to root Moto E ?

How to root Moto E


If you have decided to root your Moto E, first of all take a look over the following list; there I have detailed the pre requisites tasks that must be performed before going any further or before applying the proper root operation – don’t skip this section as it is the most relevant one.
  • Unlock the bootloader of your Motorola Moto E; you will not be able to complete this step by step guide unless you previously unlock the bootloader of your Android smartphone so apply this step first.
  • Install TWRP recovery on Moto E; similar with unlocking the bootloader, gaining root access can’t be achieved unless a custom recovery image is being flashed on your device so take care of the same.
  • Backup your data, especially the data which is saved on your phone’s internal storage memory – while trying to root your handset, your data might get wiped out or corrupted and you might end up in losing everything that’s important for you.
  • At least save your contacts, text messages, call logs, market apps, internet settings, personal info, data and accounts and the current ROM by making a Nandroid backup.
  • A computer is being required and your Moto E and its USB cord must be near you as you will have to connect your devices at some point.
  • On your computer you should temporarily disable the antivirus and antimalware programs as the security protection might interfere with our work.
  • Then, on your phone you should head towards “menu – settings – developer options” in order to enable the USB debugging option” – else you won’t be able to properly connect your device with your computer.
  • You should charge your Moto E especially if the battery power is less than 60% – if your handset gets turned off in the middle of the root operation, it might also get damages or even soft bricked.
  • This step by step guide, which is a root procedure, is compatible only with the Motorola Moto E, which means that you shouldn’t use the guidelines from below in case you own a different or similar Android smartphone or tablet.

How to Root Motorola Moto E

  1. From here download the SuperSU app file.
  2. Place this file on your computer, preferable on desktop – don’t unzip it.
  3. Then connect your Moto E with your PC by plugging in the USB cord.
  4. Up next, transfer the root file from desktop to your phone’s SD card.
  5. Unplug the USB cord and turn off your device.
  6. Enter recovery mode on your Motorola Moto E.
  7. Then from recovery select “install zip from SD card” followed by “choose zip from SD card”.
  8. Pick the root file which you have downloaded before and flash the same on your Moto E.
  9. Wait while the installation procedure is being completed.
  10. In the end select “reboot system now” and you are done.
  11. In case you are experiencing issues with your phone, return to recovery and select “wipe data factory reset”, “wipe cache partition” and “wipe dalvick cache”. In the end, return to main menu of recovery and pick “reboot system now” – that should resolve all of your problems.
Congratulations, you have successfully learned how to root your Motorola Moto E. Since a custom recovery image is also installed on your phone, now you can easily update your smartphone with a custom ROM firmware such as CM11, AOKP or ParanoidAndroid – stay close as we will develop compatible step by step guides during the following days.
Motorola-Moto-e

How to Root Xperia Devices using One-Click Root method ?

How to Root Xperia Devices using One-Click Root method

  1. As already mentioned, first of all, you need to get the rooting package on your computer.
  2. In order to do so, go here and download the one-click root tool from the xda-developers page.
  3. Save the file on your computer, preferable on desktop.
  4. Unzip the file.
  5. Then, run the root.bat executable file.
  6. Connect your Xperia device with the computer.
  7. Use the official USB cord for establishing the connection.
  8. Return to the root tool.
  9. Follow the on screen directions and root your handset.
  10. In the end, unplug the USB cable and reboot your phone.
Good job you have successfully rooted your Sony Xperia smartphone

Monday 9 March 2015

How to root Samsung Galaxy Grand 2 (SM-G7102) and install CWM.

How to root Samsung Galaxy Grand 2 (SM-G7102) and install CWM.

Steps to root Samsung Galaxy Grand 2:

Please read this carefully!
  • As mentioned earlier, this method is valid only for Grand 2 SM-G7102 variant. Do not try it on other variants; else you may brick your device. If you are not sure what version you have, you can check it by going to Settings> About device or pull your battery and find it mentioned on the sticker.
  • Warranty: Once you root your device, your warranty will be voided. However, you can regain your warranty back by flashing official firmware.
  • Disclaimer: This guide has been tested by me and works flawlessly. I am not responsible if you soft brick your device.

    Pre-requisites:
    • Make sure that you have enough battery, preferably over 80% so that it doesn’t turn off during installation.
    • You should have USB debugging enabled. To do this, go to Settings> Developer options and check the option which says “Enable USB debugging”.
    • Make sure you have Samsung’s USB driver installed on your PC. You can download the setup from here and install it.
    • Backup your entire data. Though this is not needed, but it is recommended to take complete backup, just in case if anything goes wrong. For this purpose, you may use Wondershare MobileGo for Android software, which comes with free trial.
    Alright, after following all the steps above, you are now ready to follow the next procedure. Remember, you must follow all the steps carefully in order to root your device successfully.
    [UPDATED] Complete tutorial to root Samsung Galaxy Grand 2 SM-G7102 (Working on latest Android Kitkat 4.4.2 firmware:
    • First of all, download CF auto root tool from Chainfire. Link. The CF Root tool was recently updated, so now it supports Android KitKat as well. You can use this same tool for rooting your Grand 2 running on Android 4.4.2, download it from here. Just follow the same methods below.
    • Now extract CF-Auto-Root-ms013g-ms013gxx-smg7102.zip at your desired location. You should get two files, one .tar.md5 and Odin3 v3.09.exe along with few other .DLL files.
    • Now, switch off your Grand 2 and put it in download mode. This can be done by simultaneously pressing Home, volume down and lock key together for about 4-5 seconds. It will display warning message, so continue by pressing Volume button.
    Download mode
    • Go to the folder you extracted, and right click on “Odin3 v3.09.exe” and select “Run as administrator”.
    • Connect your device to computer via USB cable. Once Odin detects your device, it will display ID: COM with light blue back ground and Added under message box of Odin.
    Root Samsung galaxy grand 2 with ODIN
    ODIN SS1
    • From Odin, click on PDA and select the downloaded package (i.e. .tar.md5)
    • Once the file is added, you should click on “Start”. It will start the process.
    • When the rooting process is completed, Odin will display the message as “PASS” or “RESET” and your device will be rebooted automatically.
    Odin SS2
    • Congratulations!!! You have successfully rooted Samsung Galaxy Grand 2.
    • After your phone reboots completely, you can go to app drawer and check “Super SU” app installed. Alternately, you can install Root checker app that will display the root status.
    Rooting samsung galaxy grand 2 (G7102) - check
    Root checker
    Install custom recovery:
    Once you have rooted your device successfully, just download Flashify app and grant root access. Grab the Philz recovery image file from here and flash it using this app with in-built options.

Known issues while rooting Samsung Galaxy Grand 2:

    • In case if your phone is stuck at boot animation after rebooting, than you will have to reset your device.
    • Note: You will lose your entire data after performing the following steps.
    o   Remove your battery so that your device is shut down completely.
    o   Insert it back again, and enter into recovery mode by pressing Volume up, Home and lock key together.
    o   In this menu, you have to use volume keys for navigating and power key for selecting the highlighted menu.
    o   From that menu, go to “wipe cache partition” and select it.
    o   After this, go to “wipe data/ factory reset” and under that menu, select “clear all” option. This will delete entire data from your smartphone’s internal memory.
    o   Select “reboot system now”, so that your phone starts normally.
    o   You can now restore your data from the backup which you had taken.
    Do let us know and share your feedback below. In case if you need any assistance or having issues during installation, feel free to ask.

How to Root AT&T/Verizon Galaxy S4 and S4 Active on Android 4.4.2!

How to Root AT&T/Verizon Galaxy S4 and S4 Active on Android 4.4.2

Step 1. Make sure you have Android 4.4.2 in Settings->About phone.
howto-root-att-or-verizon-galaxys4-1
Step 2. Open up a browser on your Galaxy S4 and go to TowelRoot.com.  Press on the Lamda sign and it will download an APK file.
howto-root-att-or-verizon-galaxys4-2
howto-root-att-or-verizon-galaxys4-3
Step 3. Click on the APK file you just downloaded.
howto-root-att-or-verizon-galaxys4-4
Step 4. Hit “Settings”.
howto-root-att-or-verizon-galaxys4-5
Step 5. Hit “Unknown Sources”.
howto-root-att-or-verizon-galaxys4-6
Step 6. Press “OK”.
howto-root-att-or-verizon-galaxys4-7
Step 7. Press “Install” to install the towelroot app.
howto-root-att-or-verizon-galaxys4-8
Step 8. Ignore the Google warning and press “Install anyway”.
howto-root-att-or-verizon-galaxys4-9
Step 9. Press “OK” to open the Towelroot app.
howto-root-att-or-verizon-galaxys4-10
Step 10. Press “make it ra1n”.  Wait about 30 seconds and if your phone doesn’t reboot, try pressing “make it ra1n” again.  If you see a force-close window, try force closing it by hitting “OK”.  Your Galaxy S4 should have rebooted.
howto-root-att-or-verizon-galaxys4-11
howto-root-att-or-verizon-galaxys4-12
Step 11. Once rebooted, download the Superuser APK file and open it with MyFiles app. (Do not download from Play Store as the version is not the latest version!)
howto-root-att-or-verizon-galaxys4-13
Step 12. Press “Settings”.
howto-root-att-or-verizon-galaxys4-14
Step 13. Press “Unknown sources”.
howto-root-att-or-verizon-galaxys4-15
Step 14. Pres “OK”.
howto-root-att-or-verizon-galaxys4-16
Step 15. Press on “Install”.
howto-root-att-or-verizon-galaxys4-17
Step 16. Hit “Open” to open the SuperSU app.
howto-root-att-or-verizon-galaxys4-18
Step 17. Press on “Continue”.
howto-root-att-or-verizon-galaxys4-19
Step 18. Press “Normal”.
howto-root-att-or-verizon-galaxys4-20
Step 19. You will also get a message to disable/remove KNOX, make sure you hit “OK” as that will remove all KNOX apps which will interfere with your root if you don’t do it.  (KNOX is an unnecessary, useless security app you DO NOT NEED, only interferes with root.)
howto-root-att-or-verizon-galaxys4-21
Step 20. Now your Galaxy S4 should be fully rooted, go ahead and download any rooted app like Titanium Backup app and you should see SuperUser pop-up window like seen below.
howto-root-att-or-verizon-galaxys4-22
Congratulations!  You’ve successfully rooted your Galaxy S4 on Android 4.4.2!

Link2Sd :free phone memory

Link2Sd

A useful app for users who are dealing with limited storage on their device. This app will help you to move your installed app to the SD card on your device so you can free up more space in your phone memory.
Link2Sd
Link2SD-1Link2SD-2
Link2SD is an application manager that makes it easy for Android 2.0+ users to move applications to the SD card, to clean all cache files of the apps. It enables you to manage your apps and storage easily.
It also provides native app to SD (app2sd) features on Android 2.2 and higher. It can move any non-protected user apps to SD card (force move), with batch moving capability.
That feature uses Android’s standard SD-card installation feature and does not require a second partition.
Cache cleaner function clears all your cache and free up space with a single tap. Also cache cleaner widget displays total cache size and enables “one tap cache cleaning” without opening the app.
Features:
– App manager
– Create and remove link for apk, dex and lib files of the app.
– Plus version also links private data files of the apps
– Automatically link newly installed apps (optional)
– Move any user apps to SD even though the app does not support moving to SD (a.k.a. “force move”, for Android 2.2 and higher)
– Shows the apps that support moving to SD with native apps2sd
– Set the default install location of the apps; auto, internal, or external
– Batch link, unlink, reinstall, uninstall, “move to SD”, “move to phone” functions
– Notify when movable apps installed
– Uninstall system applications (bloatware removal)
– Freeze and un-freeze system and users applications
– Convert system apps into user apps
– Convert user apps into system apps
– Integrate “Updated” system apps into system (ROM)
– Clear data and cache of the application
– Clear all apps cache at once (1-tap cache cleaner without being root)
– Exclusion list for “Clear all app cache” function
– Clear cache widget (1-tap cache cleaner without being root)
– Notify if total cache size exceeds specified size
– Reboot manager includes power off, normal reboot, quick (hot) reboot, reboot recovery, reboot bootloader / download mode
– Reboot widget to boot with one click
– List applications, show detailed size information and link status
– Wide variety of options to sort and filter apps
– Search applications by name
– Display available space information of internal storage, SD card and SD card 2nd partition
– Share the link of an app
– Support 40+ languages
Plus features:
– Links internal data directories of the apps to SD card
– Links dex files of the system apps to SD card
– Auto clear cache service
– Removes ads from Link2SD
What you need for linking apps:
– root permission.
– a second partition on your SD card.
You should have two partitions on SD card and both should be primary.
The first FAT partition is your standard SD card storage. The second partition is used for application files and can be ext2, ext3, ext4, f2fs or FAT.
You need to use a non-FAT file system (ext2, ext3, ext4 or f2fs) on your second partition in order to link app’s private data files. Because the FAT file system (FAT16, FAT32 or exFAT) does not support UNIX file ownership or permissions and will cause a security breakdown of app’s private files.
Link2SD Plus can move app’s private data files if you have a non-FAT partition
Link2SD does not create the second partition, you need to create it yourself. You can use any partition manager such as Minitool, Paragon, Easeus etc. for this.
When you connect your phone to PC as mass storage, Android unmounts the first FAT partition but the second partition remains mounted. Therefore linked applications are not affected and can be run without problems.
Link2SD is free (ad supported) application.
DISCLAIMER: It is made available for use at your own risk with no warranty of any kind.
Download

LBE Privacy Guard

LBE Privacy Guard

Akin to an interactive desktop firewall, this will scan and list all the permissions required by every app you install. Through this list you will be able to customize your own permission settings to decide what kind of data the app can take from you.
Don’t worry about losing your settings, because this very thoughtful app will remember them.
LBE Privacy Guard

Click to download LBE Privacy Guard apk file for Android. 

Please be aware that here only share the original and free apk installer forLBE Privacy Guard without any cheat, unlimited gold patch or any other modifications. 

DISCLAIMER: LBE Privacy Guard is the property and trademark from the developer Lamian, All rights reserved by Lamian. Please contact the developer on LBE Privacy Guard issue. 

How to install LBE Privacy Guard apk file?

1. Guide to install APK file from your computer
2. Guide to install APK file from Your Browser

How to root an Android Device?

1. Guide to root your Android

How to check the version of Android?

1. Open "settings" in your devices
2. Scroll to "about phone"
3. Look for line which says "Android Version"