How to root Samsung Galaxy Grand 2 (SM-G7102) and install CWM.
Steps to root Samsung Galaxy Grand 2:
Please read this carefully!
- As mentioned earlier, this method is valid only for Grand 2 SM-G7102 variant. Do not try it on other variants; else you may brick your device. If you are not sure what version you have, you can check it by going to Settings> About device or pull your battery and find it mentioned on the sticker.
- Warranty: Once you root your device, your warranty will be voided. However, you can regain your warranty back by flashing official firmware.
- Disclaimer: This guide has been tested by me and works flawlessly. I am not responsible if you soft brick your device.
Pre-requisites:
- Make sure that you have enough battery, preferably over 80% so that it doesn’t turn off during installation.
- You should have USB debugging enabled. To do this, go to Settings> Developer options and check the option which says “Enable USB debugging”.
- Make sure you have Samsung’s USB driver installed on your PC. You can download the setup from here and install it.
- Backup your entire data. Though this is not needed, but it is recommended to take complete backup, just in case if anything goes wrong. For this purpose, you may use Wondershare MobileGo for Android software, which comes with free trial.
Alright, after following all the steps above, you are now ready to follow the next procedure. Remember, you must follow all the steps carefully in order to root your device successfully.
[UPDATED] Complete tutorial to root Samsung Galaxy Grand 2 SM-G7102 (Working on latest Android Kitkat 4.4.2 firmware:
- First of all, download CF auto root tool from Chainfire. Link. The CF Root tool was recently updated, so now it supports Android KitKat as well. You can use this same tool for rooting your Grand 2 running on Android 4.4.2, download it from here. Just follow the same methods below.
- Now extract CF-Auto-Root-ms013g-ms013gxx-smg7102.zip at your desired location. You should get two files, one .tar.md5 and Odin3 v3.09.exe along with few other .DLL files.
- Now, switch off your Grand 2 and put it in download mode. This can be done by simultaneously pressing Home, volume down and lock key together for about 4-5 seconds. It will display warning message, so continue by pressing Volume button.
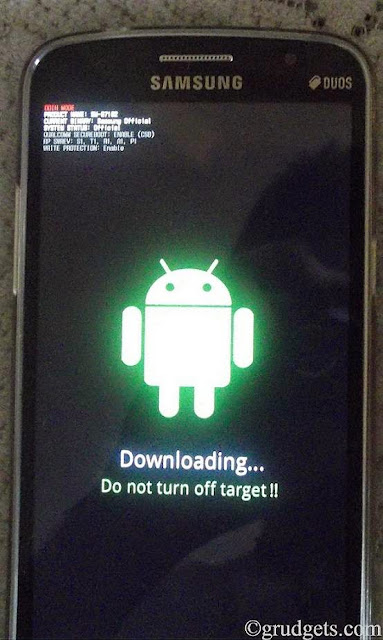 Download mode
- Go to the folder you extracted, and right click on “Odin3 v3.09.exe” and select “Run as administrator”.
- Connect your device to computer via USB cable. Once Odin detects your device, it will display ID: COM with light blue back ground and Added under message box of Odin.
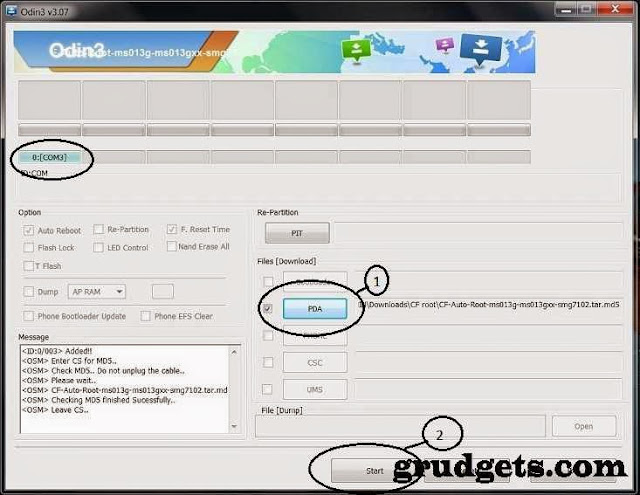 ODIN SS1
- From Odin, click on PDA and select the downloaded package (i.e. .tar.md5)
- Once the file is added, you should click on “Start”. It will start the process.
- When the rooting process is completed, Odin will display the message as “PASS” or “RESET” and your device will be rebooted automatically.
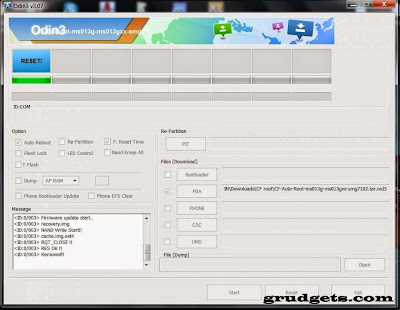 Odin SS2
- Congratulations!!! You have successfully rooted Samsung Galaxy Grand 2.
- After your phone reboots completely, you can go to app drawer and check “Super SU” app installed. Alternately, you can install Root checker app that will display the root status.
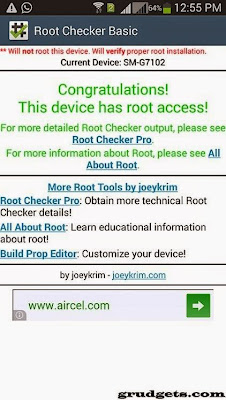 Root checker
Related: Galaxy Grand 2 review.
Install custom recovery:
Once you have rooted your device successfully, just download Flashify app and grant root access. Grab the Philz recovery image file from here and flash it using this app with in-built options.
Root checker
Related: Galaxy Grand 2 review.
Install custom recovery:
Once you have rooted your device successfully, just download Flashify app and grant root access. Grab the Philz recovery image file from here and flash it using this app with in-built options.
Pre-requisites:
- Make sure that you have enough battery, preferably over 80% so that it doesn’t turn off during installation.
- You should have USB debugging enabled. To do this, go to Settings> Developer options and check the option which says “Enable USB debugging”.
- Make sure you have Samsung’s USB driver installed on your PC. You can download the setup from here and install it.
- Backup your entire data. Though this is not needed, but it is recommended to take complete backup, just in case if anything goes wrong. For this purpose, you may use Wondershare MobileGo for Android software, which comes with free trial.
Alright, after following all the steps above, you are now ready to follow the next procedure. Remember, you must follow all the steps carefully in order to root your device successfully.
[UPDATED] Complete tutorial to root Samsung Galaxy Grand 2 SM-G7102 (Working on latest Android Kitkat 4.4.2 firmware:
- First of all, download CF auto root tool from Chainfire. Link. The CF Root tool was recently updated, so now it supports Android KitKat as well. You can use this same tool for rooting your Grand 2 running on Android 4.4.2, download it from here. Just follow the same methods below.
- Now extract CF-Auto-Root-ms013g-ms013gxx-smg7102.zip at your desired location. You should get two files, one .tar.md5 and Odin3 v3.09.exe along with few other .DLL files.
- Now, switch off your Grand 2 and put it in download mode. This can be done by simultaneously pressing Home, volume down and lock key together for about 4-5 seconds. It will display warning message, so continue by pressing Volume button.
Download mode
- Go to the folder you extracted, and right click on “Odin3 v3.09.exe” and select “Run as administrator”.
- Connect your device to computer via USB cable. Once Odin detects your device, it will display ID: COM with light blue back ground and Added under message box of Odin.
ODIN SS1
- From Odin, click on PDA and select the downloaded package (i.e. .tar.md5)
- Once the file is added, you should click on “Start”. It will start the process.
- When the rooting process is completed, Odin will display the message as “PASS” or “RESET” and your device will be rebooted automatically.
Odin SS2
- Congratulations!!! You have successfully rooted Samsung Galaxy Grand 2.
- After your phone reboots completely, you can go to app drawer and check “Super SU” app installed. Alternately, you can install Root checker app that will display the root status.
Root checker
Related: Galaxy Grand 2 review.
Install custom recovery:
Once you have rooted your device successfully, just download Flashify app and grant root access. Grab the Philz recovery image file from here and flash it using this app with in-built options.
Known issues while rooting Samsung Galaxy Grand 2:
- In case if your phone is stuck at boot animation after rebooting, than you will have to reset your device.
- Note: You will lose your entire data after performing the following steps.
o Remove your battery so that your device is shut down completely.
o Insert it back again, and enter into recovery mode by pressing Volume up, Home and lock key together.
o In this menu, you have to use volume keys for navigating and power key for selecting the highlighted menu.
o From that menu, go to “wipe cache partition” and select it.
o After this, go to “wipe data/ factory reset” and under that menu, select “clear all” option. This will delete entire data from your smartphone’s internal memory.
o Select “reboot system now”, so that your phone starts normally.
o You can now restore your data from the backup which you had taken.
Do let us know and share your feedback below. In case if you need any assistance or having issues during installation, feel free to ask.


0 comments:
Post a Comment